Drupal Tutorial How to send text messages using the Twilio module
Feb 11, 2015
In this tutorial we are going to create a rule that will send text messages to all of our sites admins when a new page has been created.
This is just a simple example, but with this configuration you could:
- Notify a store owner when an order has been placed.
- Notify your customers when a new product has been released.
- Notify management when employees login.
- Notify a teacher when a student has completed a quiz.
There are many other possible ideas, but we just wanted to get the basic foundation setup. Once the foundation is set, you may further tweak and add additional features.
I also want to note that there are many other ways to do this, but my goal here was to avoid heavier modules and to keep things as simple as possible.
Tutorial
Installing the necessary modules
The first thing you want to do is open up your terminal window and navigate to the root of your Drupal website.
Next we need to add a few modules, so we are going to type the following drush command to quickly download them.
$ drush dl views ctools entity rules views_rules libraries twilio
Then we are going to enter the following drush command to enable the modules.
$ drush en views views_ui ctools entity entity_token rules rules_admin views_rules libraries twilio -y
If by changes you are not not using drush (and if not you should be) to download and enable modules, here is a list of links to their project pages. Views Ctools Entity API Rules Views Rules Libraries Twilio
After we have downloaded and enabled all of the modules we need to add the Twilio PHP library files.
First we need to create the libraries directory with the following command.
$ mkdir sites/all/libraries
Finally we need to navigate into the directory and clone the git repo for the Twilio PHP library files.
$ cd sites/all/libraries
$ git clone https://github.com/twilio/twilio-php.git twilio
Configuring Twilio
Now that we have the modules in place we should create our Twilio account (if you haven’t yet). To create an account you just need to go to the Twilio site and click the Sign Up link and fill out their form.
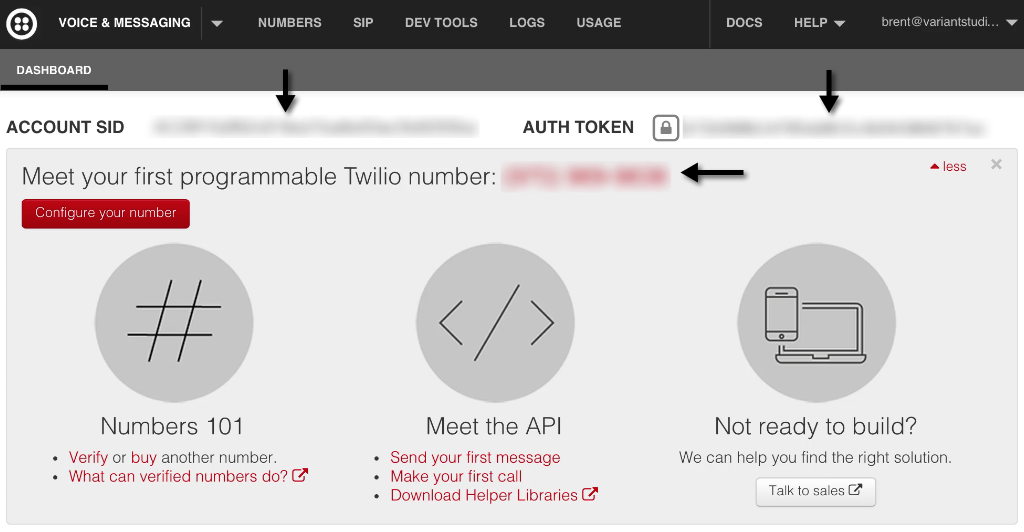
After you have created your account, you’ll need to go to your user account dashboard to get your Twilio Account SID, Twilio Auth Token and phone number.
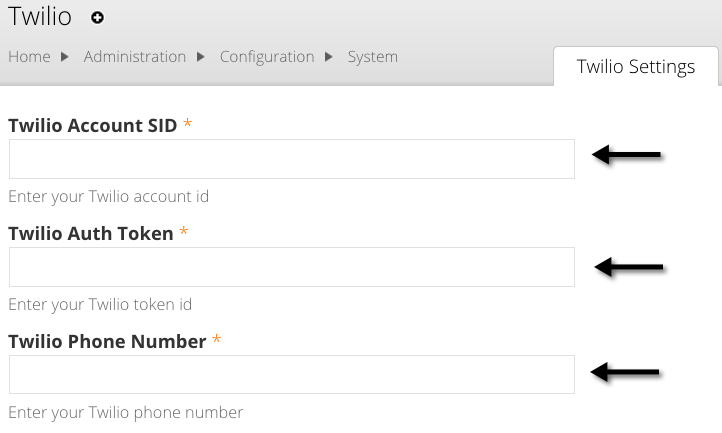
Now we need to fill out the Twilio module settings page with your Twilio account info. In your Drupal website navigate to the Twilio module settings page (/admin/config/system/twilio). Then copy and paste over your Twilio Account SID, Twilio Auth Token and phone number into the Twilio module’s settings page. After you have filled out the required fields the optional settings are up to you.
Once you are done with that page click “Save Configuration” and then click “Send Test SMS message”. Here you can send a test text message to make sure the Twilio module is successfully working.

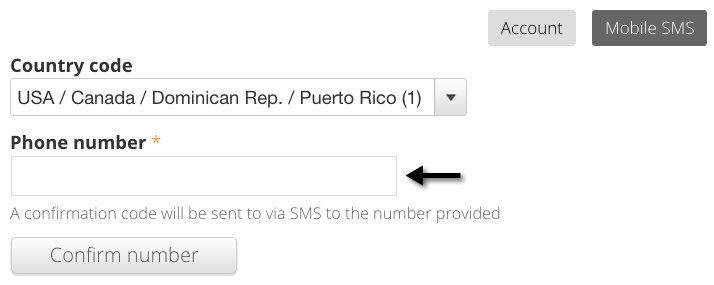
Now we need to edit our Drupal user account to add our cell phone number so our account can dynamically receive text messages. Go to your user page and click edit. Then you should see a new link on the top right labeled “Mobile SMS”, click that link. Enter in your cell phone number (just numbers and no special characters) and click “Confirm number”. This will send you a text message with a confirmation code. When you receive that code enter it into the form and click the “Confirm number” button.
Secret Sauce
To make a rule that sends a text message to only users with a certain role requires us to use the Views Rules Module. We will basically be creating a View that will list all of the users that have the role Administrator. Then we will create a Rule that will use this view to loop through the list of users and send a text to each one.
Create the View
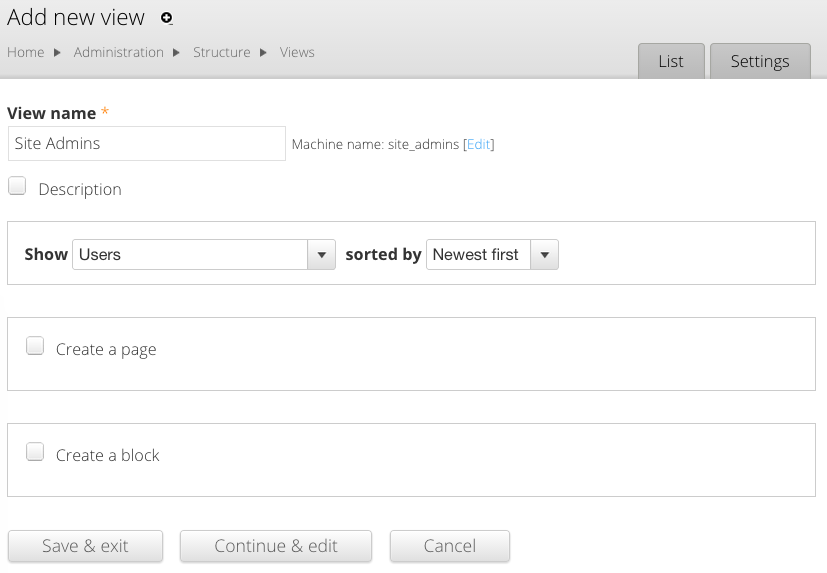
So lets create the view to pull in all of the Administrators. Under Structure > Views > click “Add new view” and give it a name, under “Show” select “Users” and make sure “Create a page” and “Create a block” are both unchecked and click “Continue & edit”.
Now we need to build out the view in the Master Display.
- First thing we should do is add “User: Uid” to the “Fields” and then remove the “User: Name” field.
- Under “Filter Criteria” add “User: Roles” and make sure you select “Is one of” and select administrator (or any other role you would like to send to) under the “Options” list.
- I would also recommend adding “Twilio: Phone number” as a filter and select “Is not equal to” under the Operator and then add “null” for the value. This will make sure your site isn’t going to try to send a text message to a user that doesn’t have cell number attached to their account.
- Under the “Pager” section change to view all by clicking “Full” and switch it to “Display all items”.
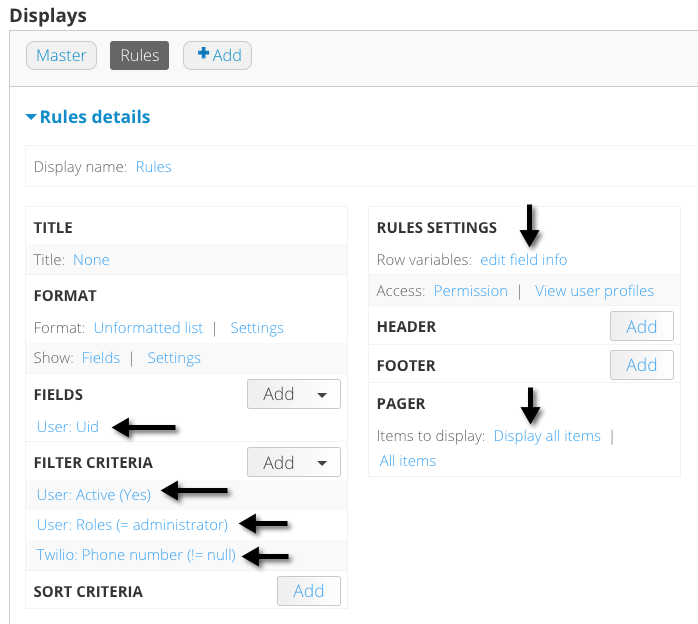
- Now we need to add the “Rules” display by clicking the “+ Add” button next to “Master” under Displays.
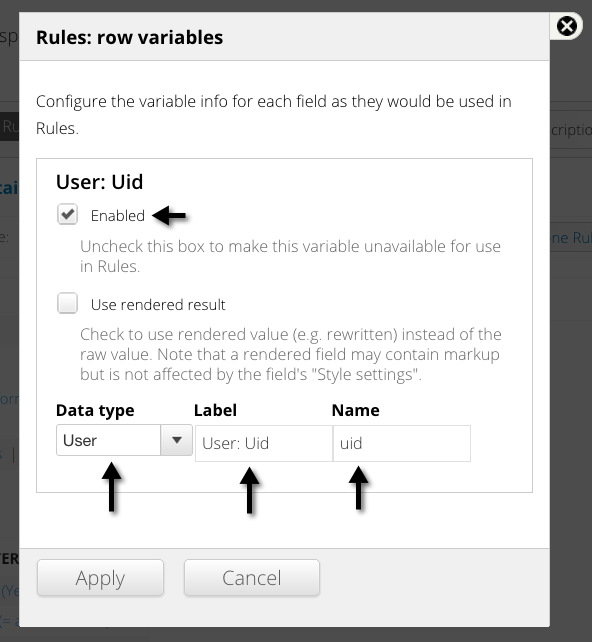
- Once that’s been created you need to click the “edit field info” next to “Row variables”. It should open up a window where you will just need to select “User” (listed under Entity) for the “Data type” and click Apply. Now we are done with the View and we can click Save.
Create the Rule
Now let’s create the rule that will text users when a new page has been created.
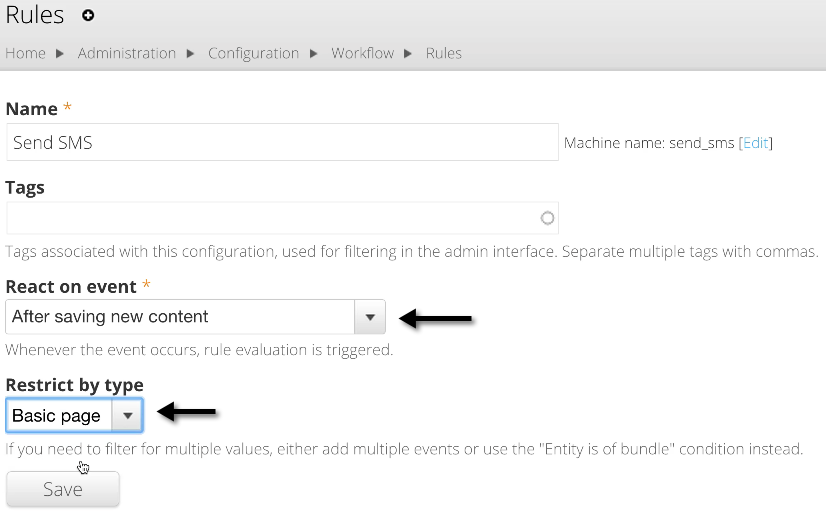
- Navigate to the Rules UI page located under Configuration > Workflow > Rules (/admin/config/workflow/rules) and click the “Add new rule” button.
- Add a name for your rule and under “React on Event” select “After saving new content” (under the Node category). Once that’s selected you will select the option “Restrict by type” and then select “Basic page” (or any other content type you would like to use, it’s up to you) and click the Save button.
Now click “Add view loop” button under “Actions”.
- In the “Views iterator display” select “Rules” under your view listed in the select list and click continue.
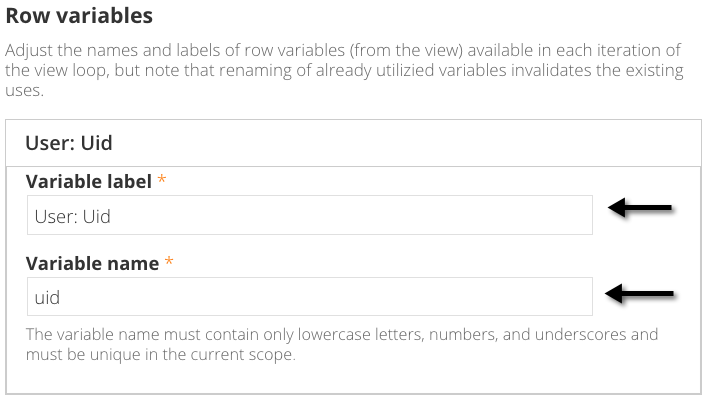
- Next everything should be prefilled the way it needs to be with “User: Uid” under “Variable label” field and “uid” under the “Variable name” field. Click the save button.
Under the “Operators” for the new “Views loop” that we just created click the “Add Action” button. Then under the “Select the action to add” option choose “Send an SMS to a user”.
A separate window will then pop up that lets you edit the action.
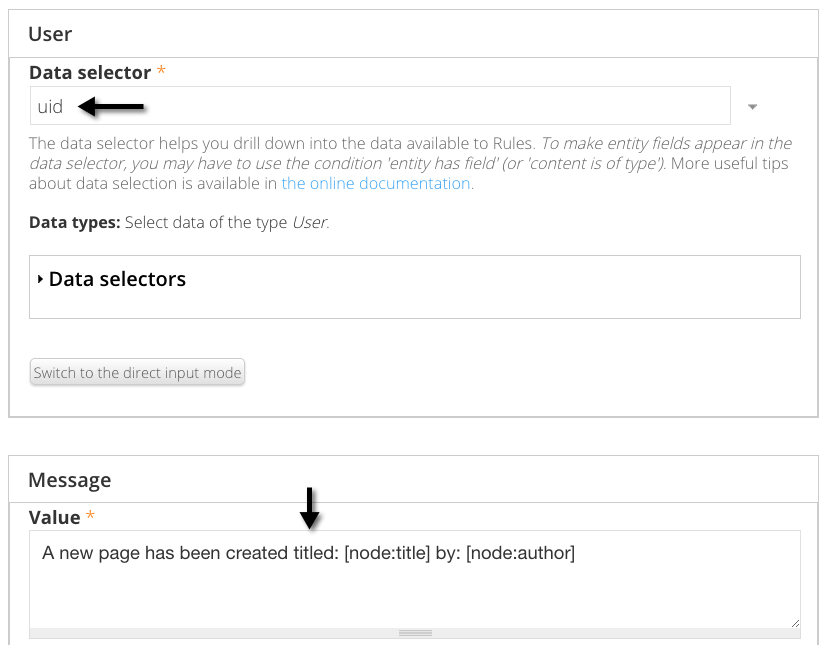
- Under the “Data selector” field, enter “uid”.
- In the Message box enter the message that you want to be transmitted to the recipients. We used the one below.
A new page has been created titled: [node:title] by [node:author]
After you have created your message click “Save” at the bottom. Now its time to test!
Testing
To test our feature, create a test page. Once that has been created you should then receive a text message.
Now that we know it’s working, try experimenting with the rule by using different actions and/or conditions.
Wrap up
Thanks for following this tutorial. If you have any questions or comments please add them below.
Follow us on twitter or youtube to be notified when we release more tutorials.